The Spirit Temple in The Legend of Zelda: Ocarina of Time Remake is one of the few dungeons you cannot finish in a single visit. You'll first enter its narrow passage as young Link, collect the Silver Gauntlets, then return seven years later to open the adult route. Along the way, you'll have to deal with moving statues, sunlight puzzles, several Iron Knuckles, and a rather unpleasant pair of witches. In this walkthrough, we'll take you through both halves of the Spirit Temple, explain where to find all five Small Keys and show you how to get the Mirror Shield, Boss Key, and Spirit Medallion.
How to Reach the Spirit Temple and Prepare for Both Visits
The Spirit Temple stands in the Evil Desert Colossus, beyond Gerudo Fortress and the Mirage Desert (the Haunted Wasteland in the original game). Visit the area as an adult Link first. You'll need to rescue the four carpenters at the fortress, cross the desert using the Longshot and Lenses of Truth, and reach the temple entrance. After your first visit, Sheik teaches you the Requiem of Spirit, allowing you to return to the Colossus without crossing the sandstorm again.There is no point trying to force your way through the entire dungeon as an adult just yet. Return to the Temple of Time, put the Master Sword back in its pedestal, and play the Requiem of Spirit as young Link. You'll appear right outside the Spirit Temple, ready to enter through a passage your older self cannot use.Spirit Temple entrance at the Desert ColossusSpirit Temple entrance at the Desert ColossusBefore starting, we recommend bringing the following equipment:
Young Link: Boomerang, Fairy Slingshot, bombs, Deku Sticks, Din's Fire, and a Hylian Shield. Keep some magic for the rooms with fire-based enemies.
Adult Link: Longshot, Fairy Bow, Megaton Hammer, bombs, and the Lenses of Truth. You'll also use Zelda's Lullaby and the Song of Time.
For both visits: A few recovery items and enough hearts to survive the Iron Knuckles. Their attacks can take off a considerable amount of health if you get caught standing in front of them.
There are five Small Keys along the main route: two in the child section and three in the adult section. The Boss Key is separate. You don't need to collect every Gold Skulltula or open every optional chest to finish the temple, so we'll mention worthwhile detours without interrupting the main route.
Spirit Temple Walkthrough as Young Link
Talk to Nabooru and Enter the Child Passage
Climb the stairs inside the entrance hall and turn left. You'll find Nabooru beside a small opening in the wall. Speak to her and agree to retrieve the Silver Gauntlets. Once the conversation ends, crawl into the passage and follow it to a round room with enemies and several doors.Speak to Nabooru to begin the child section of the Spirit TempleSpeak to Nabooru to begin the child section of the Spirit TempleStart by clearing the immediate threats. There are bats and an Armos that comes to life when disturbed. Don't stand directly in front of the statue once it starts moving; circle around, attack during an opening, and back away when it is about to explode. After the room is clear, take the left-hand door to continue toward your first key.Clear the round chamber and defeat the Armos before moving onClear the round chamber and defeat the Armos before moving on
Lower the Bridge and Defeat Anubis
In the next chamber, defeat the Stalfos before attempting the puzzle. The enemy's shield makes reckless attacks a waste of time, so wait for it to strike and counter from the side. Once the path is safe, look across the gap for a crystal switch behind a raised metal barrier.Defeat the Stalfos before dealing with the bridge puzzleDefeat the Stalfos before dealing with the bridge puzzleUse the Boomerang to hit the crystal. The trick is to aim slightly to one side, allowing the returning Boomerang to curve around the obstacle. When the switch activates, the metal grate lowers into a bridge. Cross it, watch out for the flying pots, and continue through the passage ahead.The following room contains an Anubis, an enemy that copies Link's movements. Ordinary sword attacks aren't the answer here: you need fire. You can use Din's Fire when the creature gets close enough, or activate the room's flame and maneuver until Anubis moves into it. If you're short on magic, the second method saves a spell for later. Once the enemy disappears, the next door opens.
Collect the Silver Rupees and Find Small Key 1
The next room has mesh walkways, dangerous enemies, and a set of Silver Rupees scattered around the upper and lower sections. Clear the Fire Keese before doing anything else. We also recommend watching for a Wallmaster: letting it grab you means another trip through the rooms you've just cleared.Carefully move through the narrow walkways while collecting the Silver RupeesCarefully move through the narrow walkways while collecting the Silver RupeesCollect the Silver Rupees around the grates and corners until the bridge or exit opens. Don't forget to look near the torch at the edge of the room. If you see a Gold Skulltula on the mesh, you can collect its token with the Boomerang, but it isn't required to advance.Continue to the room with unlit braziers. Light a Deku Stick using the existing flame, then carry it to the two unlit torches. Open the chest that appears between them to receive Small Key 1. From here, take the nearby door back toward the round junction instead of retracing the entire bridge route.
Climb to the Upper Floor and Open the Sunlight Passage
Back at the junction, crawl into the other low passage and use your newly acquired key on the locked door. Before climbing the mesh wall, shoot the Skullwalltulas attached to it. Getting knocked off halfway up is annoying enough; there's no reason to let it happen twice.On the upper level, defeat the Lizalfos and look for a crystal switch positioned high on the wall. Hit it with the Slingshot to reveal a chest containing five Bombchus. Keep these for the next puzzle rather than wasting them on ordinary enemies.You'll need these Bombchus for the cracked wall puzzle in the next stepYou'll need these Bombchus for the cracked wall puzzle in the next stepYou'll notice a cracked section high on the wall where a little sunlight is leaking through. Send a Bombchu crawling up the wall toward the obstruction. Once it explodes, the opening lets a proper beam of sunlight into the room, activating the sun emblem and opening the way forward. If your Bombchu misses, adjust Link's position and launch the next one along a straighter line.
Open the Giant Statue Hall and Get the Dungeon Map
You'll arrive in a large chamber dominated by a giant statue. Remember this room, because you'll return here as adult Link and eventually use the statue itself to reach the boss. For now, stay focused on the child route rather than trying to reach every platform you can see.There's an optional Dungeon Map chest you can open by lighting the required torches in the hall. We recommend picking it up, especially if you're planning to collect the Gold Skulltulas afterward. With the map secured, head toward the upper walkway and the barred door.Lighting the torches in the giant statue hall reveals the Dungeon Map chestLighting the torches in the giant statue hall reveals the Dungeon Map chestA small moving statue stands near the ledge above the floor switch. Climb the nearby mesh, push the statue down, then return to the lower floor and move it onto the switch. This removes the bars from the upper doorway. Climb back up the stairs and go through before continuing into the rooms with sunlight and movable blocks.
Solve the Sun Block Puzzle and Find Small Key 2
The next section contains Beamos, Blade Traps, Silver Rupees, and several stone blocks. Get rid of the Beamos with bombs first. Otherwise, you'll spend the entire puzzle dodging beams while trying to push blocks into position.Look for the block marked with a sun emblem. The ordinary blocks are in its way, so move them aside until you can drag the marked block into the shaft of sunlight. The sun mechanism reveals the route toward another key chest. You'll also need to collect the room's Silver Rupees and deal with the torch puzzle to finish opening the way through this section.Move the blocks until the sun-marked one can be pushed into the lightMove the blocks until the sun-marked one can be pushed into the lightCheck both the upper and lower ledges while collecting the rupees. One is positioned high enough that you'll need to use the movable blocks to reach it. If you've already activated the sun emblem but a door remains barred, don't waste time repeatedly pushing the same block: check the remaining rupees and unlit torches instead.Once the room's mechanisms are solved, open the chest for Small Key 2. Continue up the stairs toward the locked door. Before leaving the corridor, turn around and look above the doorway for an optional Gold Skulltula that can be reached with the Boomerang.
Beat the First Iron Knuckle and Get the Silver Gauntlets
Use the second Small Key and enter the large chamber ahead. An Iron Knuckle is waiting here, and even though its attacks are slow, one mistake can cost you a lot of health. Don't try to trade blows with it. Approach just close enough to provoke an axe swing, retreat or dodge to the side, and attack while the weapon is recovering.Bait the Iron Knuckle's swings and punish the recovery to win safelyBait the Iron Knuckle's swings and punish the recovery to win safelyThe downward strike is particularly useful because the axe stays in the floor for a moment, giving you a clear opening. You can also use bombs if you'd rather keep your distance. Once the Iron Knuckle loses its armor, it becomes faster, so shorten your attacks and move away before it swings again.After the fight, go through the door beyond the arena and step outside onto the Colossus. Open the large chest for the Silver Gauntlets. Young Link cannot use them yet, but that's exactly why this dungeon has two separate routes. Watch the scene with Nabooru, Kotake, and Koume, then leave the temple.You now have both child-route Small Keys and the Silver Gauntlets. There's nothing else you need to do here as young Link to finish the main story.
Spirit Temple Walkthrough as Adult Link
Play the Prelude of Light to return to the Temple of Time, pull the Master Sword, and play the Requiem of Spirit again. Re-enter the dungeon as adult Link and climb the entrance stairs. This time, head right instead of taking Nabooru's small passage.Use the Requiem of Spirit to warp back to the Desert Colossus for the adult half of the dungeonUse the Requiem of Spirit to warp back to the Desert Colossus for the adult half of the dungeon
Move the Large Block and Get the Compass
The corridor ahead is blocked by a huge stone block. With the Silver Gauntlets equipped, Link can finally move it. Push the block forward until it drops out of the way, then enter the next room.Clear the Beamos with a bomb and activate the crystal switch above you using the Longshot. This opens the side routes. Take the left branch first, defeat the Wolfos, and stand on the Triforce-marked carpet. Play Zelda's Lullaby to make a chest appear across the room. Use the Longshot target near it to reach the other side and collect the Compass.There's no reason to fight your way through this branch again once you have the item. Return to the central junction and take the other doorway.
Collect the Silver Rupees in the Rolling Boulder Room
The next chamber is a narrow maze with rolling boulders and Silver Rupees. Don't rush along the middle of the room. Watch the boulders' movement, move between safe alcoves, and only step into their path when they're heading away from you.Move between the alcoves and collect all the Silver Rupees while avoiding the rolling bouldersMove between the alcoves and collect all the Silver Rupees while avoiding the rolling bouldersSome of the collectibles are hidden around blue blocks marked with the symbol of time. Stand near a block and play the Song of Time to move it, then inspect the newly opened alcove. You'll also need to reach the higher rupee using the mesh and raised platforms. Make another pass around the edges if the exit stays barred; it's easy to miss one tucked behind a block while concentrating on the boulders.When all five Silver Rupees are collected, pass through the opened door. A Like Like is waiting in the next area. Keep your shield away from its mouth and defeat it before approaching the chest, as it can swallow equipment if you get too close. Open the chest for Small Key 3, your first key as an adult.
Rotate the Mirror and Reach the Statue's Hand
Return through the boulder chamber and spend Small Key 3 on the remaining locked door near the original junction. Deal with the flying pots in the corridor, defeat the Like Like, and climb the tall mesh wall at the far end. In the room above, use the Lenses of Truth to reveal the invisible Floormaster. Kill the main hand and then its smaller pieces before they can escape.Now you can work on the rotating mirror. Turn it until the sunlight reaches the sun emblem that opens the exit. Other emblems may reveal optional chests or spring a trap, so there's no need to activate every one of them just because they are visible.Rotate the mirror until the sunlight hits the correct sun emblemRotate the mirror until the sunlight hits the correct sun emblemContinue into the giant statue hall. Climb to the ledge overlooking one of its stone hands, where you'll find another Triforce symbol. Play Zelda's Lullaby. A chest appears on the opposite hand, and you can reach it by using the Longshot target nearby. Open it for Small Key 4.Hit the crystal switch to open the route toward the final mirror puzzleHit the crystal switch to open the route toward the final mirror puzzleIf you're interested in the optional shortcuts, you can also explore the lower side of this hall and activate the rusty switches with the Megaton Hammer. Those mechanisms make returning to the entrance easier, but they aren't needed for your next key. We recommend continuing upstairs while you still remember the route.
Cross the Enemy Rooms and Get to the Mirror Shield
Return to the upper walkway and open the locked door using Small Key 4. The rooms ahead are packed with Beamos and Anubis, so keep bombs and a source of fire ready. Destroy the Beamos first and use Din's Fire or the room's flame mechanism against Anubis. Don't waste arrows trying to hurt an enemy that can be dealt with more reliably using fire.
Cross the connected platforms and enter the chamber with several Armos statues and a floor switch. One of the statues must hold down the switch to keep the onward door open. Wake the appropriate Armos and lure it onto the plate. Once it is positioned correctly, use the opening to reach the next corridor. You'll return to the sun emblem here later, so remember where it is.Lure the correct Armos onto the floor switch to keep the next door openLure the correct Armos onto the floor switch to keep the next door openClimb the stairs and prepare for another Iron Knuckle. The same approach as before works well: bait the axe, step out of range, and hit the enemy while it recovers. If you take damage, don't let that tempt you into attacking more aggressively. The knight has plenty of openings as long as you don't stand directly in front of it.Defeat Iron Knuckle Nabooru before heading into the Twinrova fightDefeat Iron Knuckle Nabooru before heading into the Twinrova fightWhen the battle ends, pass through the door and head outside to a second large chest. This one contains the Mirror Shield. Equip it immediately. You'll be using its ability to reflect sunlight for most of the remaining puzzles, and your ordinary shield won't do the job.
Reflect Sunlight and Collect Small Key 5
Return to the room with the Armos statues and the shaft of sunlight. Stand where the light reaches the floor, raise the Mirror Shield, and turn Link until the reflected beam hits the sun emblem above the sealed doorway. You may need to adjust your position slightly to hold the beam on the symbol long enough.Go into the newly opened area and collect Small Key 5. This is the final Small Key required on the main route. You should now have obtained two as a child and three as an adult; if the next locked door won't open, you have probably left one of the earlier chests unopened.Return to the connecting room and use the last key on the remaining locked passage. Beyond it, you'll find a tall chamber with enemies and moving mesh sections. Destroy the Beamos before climbing, then advance in stages. Stop on the intermediate ledges to fight the Lizalfos rather than trying to reach the top while enemies are attacking you from behind.Use the final Small Key to pass the locked door and continue through the upper templeUse the final Small Key to pass the locked door and continue through the upper templeTime the next climb so the moving sections line up, then continue to the upper floor. The remaining rooms lead toward the Boss Key and the mechanism above the giant statue.
How to Get the Boss Key in the Spirit Temple
On the fourth floor, find the Triforce-marked carpet and play Zelda's Lullaby to open the way forward. You'll eventually enter a room with a large ornate chest surrounded by fire. Don't bother trying to put the flames out with the Mirror Shield. The chest is protected by a floor switch on a raised ledge, and getting to that switch is the actual puzzle.The Boss Key chest is surrounded by flames. Activate the raised floor switch to extinguish themThe Boss Key chest is surrounded by flames. Activate the raised floor switch to extinguish themFirst, clear the enemies so you can aim without being interrupted. Find the wooden false door beside the metal grate and hit it with the Megaton Hammer. An eye switch is hidden behind it. Shoot the eye with the Fairy Bow, then look up for the Longshot target that allows you to reach the raised mesh platform.Step onto the switch above the room. This extinguishes the flames around the chest below. Drop back down and open it to receive the Boss Key. We recommend collecting it before you spend time adjusting the final mirrors; otherwise, you'll reach the boss entrance and have to retrace your steps.
How to Solve the Final Mirror Puzzle and Open the Statue's Face
Leave the Boss Key room and follow the upper passage to the chambers with rotating mirrors. A crystal switch beside the bars opens the side route. Clear the enemies first, including the Lizalfos and floating skulls, then inspect the wall separating the mirror stands.You'll notice a cracked section of stone. Destroy it with a bomb to make an opening for the light. Rotate the first mirror until its beam passes through the hole and reaches the second stand. Now turn the second mirror so the light travels through the barred opening into the chamber with the suspended platform. If the beam doesn't reach the next room, return to the first mirror and make a small adjustment rather than moving both mirrors at random.Break the cracked wall to create a path for the light between the two mirrorsBreak the cracked wall to create a path for the light between the two mirrorsOnce the light is directed correctly, return to the chamber overlooking the giant statue and stand on the suspended platform. Use the Mirror Shield to reflect the incoming beam onto the sun emblem on the wall. Keep the reflection steady until the platform lowers into the large hall below.Stand on the suspended platform and reflect sunlight onto the sun emblem to lower itStand on the suspended platform and reflect sunlight onto the sun emblem to lower itYou're almost the boss. While standing on the lowered platform, aim the reflected sunlight at the sun marking on the statue's face. Hold it there until the face breaks away, revealing a passage and a Longshot target. Pull yourself across and open the ornate door with the Boss Key.Reflect sunlight onto the statue's face to reveal the passage leading to the bossReflect sunlight onto the statue's face to reveal the passage leading to the boss
How to Defeat Iron Knuckle Nabooru
The witches have one last armored opponent waiting for you before the final battle. This Iron Knuckle fights much like the earlier ones, so don't change a tactic that already works. Keep enough distance to avoid the axe, move sideways when the swing begins, and punish the long recovery with a few sword strikes.Be especially careful once the armor breaks and the enemy starts moving faster. You don't need to finish the fight in a single opening; take your time and stay out of range between attacks. When the armor is finally destroyed, you'll discover who was forced to fight you. Watch the scene, then proceed through the next doorway to face Twinrova.
How to Beat Twinrova in the Spirit Temple
Phase 1 — Reflect Fire and Ice Between the Witches
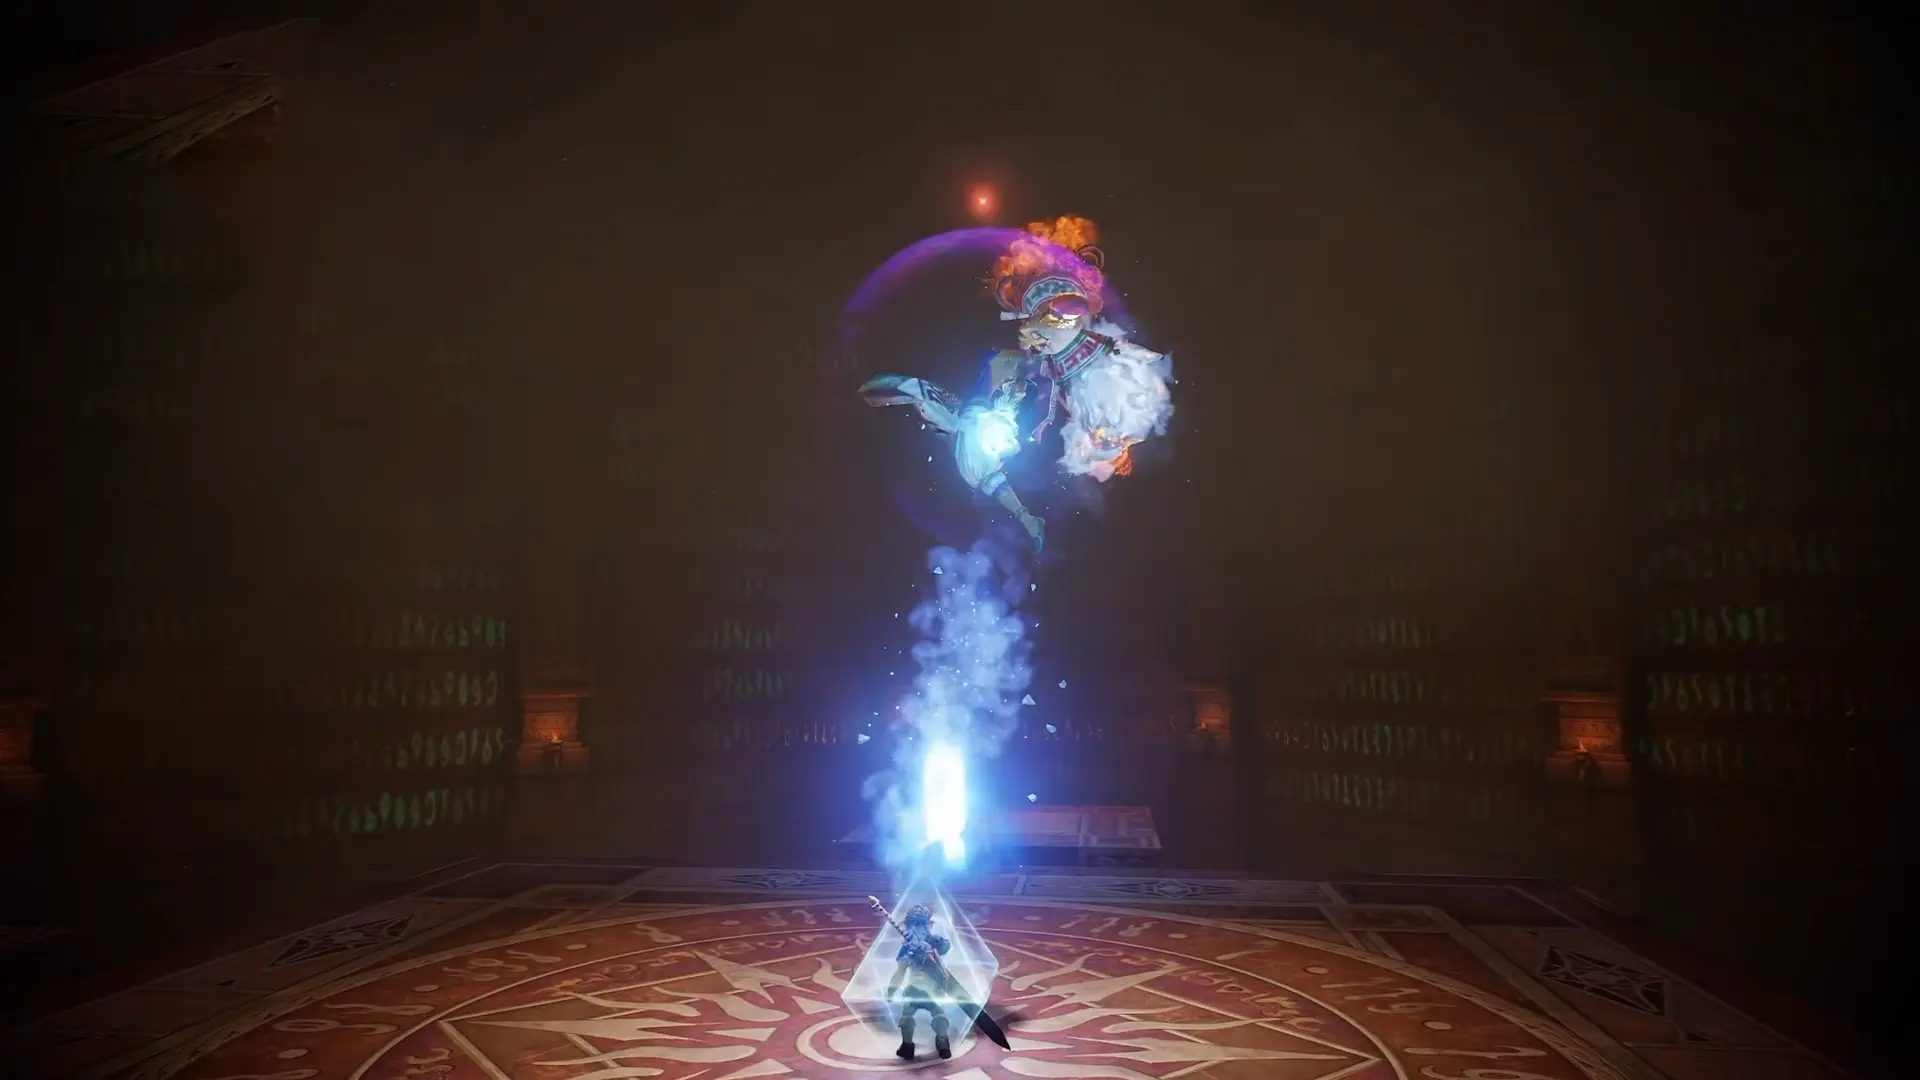
At first, you'll fight Koume and Kotake separately. One uses fire and the other ice, and neither can be defeated by simply running up and swinging your sword. The Mirror Shield is the key to this encounter.When the fire witch attacks, raise your shield to catch the beam and turn toward the ice witch. When the ice witch fires, redirect her attack toward the fire witch. In other words, each sister must be struck with the opposite element. Try to keep both of them in view so you can turn quickly when one begins casting.Use the Mirror Shield to redirect each witch's attack toward her sisterUse the Mirror Shield to redirect each witch's attack toward her sisterMissed spells leave dangerous patches on the arena, so don't linger where an attack has just landed. Stand on safe ground, watch which sister is preparing to fire, and reflect the beam toward her counterpart. Repeat until the two witches join together and the second phase begins.
Phase 2 — Charge the Mirror Shield and Stun Twinrova
Once the witches fuse, Twinrova starts alternating between fire and ice attacks. This time you need to absorb three blasts of the same element with the Mirror Shield. After the third matching hit, the shield releases the stored energy at the boss.The important part is not to mix the elements. If you've caught fire, dodge the ice attacks until she fires again. The same applies in reverse. Keep the shield ready, watch the color of the incoming spell, and reposition instead of trying to catch everything she throws at you.Absorb three attacks of the same element to unleash a charged blast against TwinrovaAbsorb three attacks of the same element to unleash a charged blast against TwinrovaWhen your charged attack hits Twinrova, she'll fall onto one of the platforms. Run over and attack with your sword while she's stunned. Don't stay there longer than necessary: once she recovers, return to a safe position and start charging the shield again. A few successful cycles are enough to finish the fight.After Twinrova is defeated, collect the Heart Container and enter the blue warp. You'll meet Nabooru again and receive the Spirit Medallion, completing the Spirit Temple.
Optional Gold Skulltulas and Other Items
If you want to collect everything in the temple, don't ignore the side passages just because they aren't needed for the main story. There are five Gold Skulltulas spread across the child and adult routes. Several are easy to pick up as you pass, while others require a short detour or a previously learned song.
Child route, mesh room: Check the climbable metal grating during the first-key section. Use the Boomerang to retrieve the token if you can't reach it directly.
Child route, upper passages: Search the area around the giant statue and look back above the doorway in the passage before the first Iron Knuckle.
Adult route, rolling boulders: Inspect the alcoves opened by playing the Song of Time at the blue blocks.
Adult route, upper statue hall: If you have the Scarecrow Song, use it at the appropriate perch and Longshot across to the optional ledge.
You can also pick up the Dungeon Map during the child visit, the Compass near the beginning of the adult route, and extra bombs or recovery items from optional chests. None of these detours changes the main sequence: Silver Gauntlets as a child, Mirror Shield as an adult, then the Boss Key and Twinrova. Once you've collected the Spirit Medallion, you're ready to continue the main quest and return to the Temple of Time when the remaining Sages have been awakened.